Convert DJI Thermal to TIFF for Metashape Orthomosaics
Convert DJI Matrice 30T / 4T / H30T thermal R-JPEGs to float32 TIFF with CRITIR Convert, then build a temperature-preserving thermal orthomosaic in Agisoft Metashape. Step-by-step Align Photos / Build DEM / Raster Transform / GeoTIFF export, with practical settings and orthomosaic pitfalls.

DJI thermal R-JPEGs from the Matrice 30T, Matrice 4T, Zenmuse H30T, and similar cameras cannot be dropped straight into Agisoft Metashape as temperature data. To produce a thermal orthomosaic with real per-pixel temperatures, you need a two-stage workflow: convert the DJI R-JPEGs to single-channel float32 TIFFs first, then run them through Metashape's SfM pipeline.
This guide walks through converting DJI R-JPEGs to TIFF with CRITIR Convert and exporting a thermal orthomosaic in Agisoft Metashape. Same steps for M30T, M4T, and H30T (see also our Matrice 4T complete guide and the Zenmuse H30T complete guide for camera-specific quirks, and the broader DJI → FLIR / Pix4D conversion guide for tooling comparisons).
TL;DR
- DJI thermal R-JPEGs cannot be opened directly in Metashape. Metashape natively supports some thermal formats (FLIR R-JPEG, WIRIS TIFF, AscTec ARA), but DJI's proprietary R-JPEG is not one of them. To get DJI temperature data into Metashape, you have to convert to single-channel float TIFF with an external tool.
- CRITIR Convert handles the TIFF side. Output is a single-channel float32 TIFF with pixel values in degrees Celsius. Round-trip error is 0.000 °C (bit-exact).
- The Metashape side is a normal SfM run with thermal-specific tuning: Add Folder → check temperatures on single images → Align Photos → Build Point Cloud → Build DEM → Build Orthomosaic → Export. The big knobs are flight overlap and Align Accuracy.
- No raster transform formula needed for temperature. Since CRITIR Convert TIFF values are already in °C,
Set Raster Transformis for display/inspection only — no formula required.
Why DJI thermal images cannot drive a Metashape orthomosaic directly
Metashape officially supports thermal orthomosaic generation and can read several thermal formats directly — FLIR R-JPEG, WIRIS TIFF, and AscTec ARA all carry temperature arrays Metashape can decode. DJI's proprietary thermal R-JPEG is not on that list. To preserve temperatures through to the orthomosaic, you have to convert to single-channel float TIFF with an external tool before loading.
DJI thermal R-JPEGs, despite the .JPG extension, are not Metashape-readable as temperature. Inside is a JPEG container plus an APP1 marker carrying a DJI-proprietary radiometric block that Metashape doesn't parse. Load one directly and you get the visible preview only — the temperature array is lost. (FLIR Tools has the same problem from a different angle: it expects FLIR's FFF block, which the DJI file doesn't contain.)
So the workflow has to be:
- Extract per-pixel temperatures from the DJI R-JPEG and write them as single-channel float32 TIFF (this guide: CRITIR Convert)
- Run those TIFFs through Metashape's SfM → Orthomosaic pipeline
If step 1 is sloppy, you get a pretty mosaic with broken temperature numbers. The conversion accuracy directly bounds the quality of the final product.
Step 1: Convert DJI R-JPEGs to TIFF with CRITIR Convert
Prepare the float32 TIFFs you'll feed to Metashape. (For what a float32 °C TIFF is and why a plain "Save as TIFF" won't work, see the DJI thermal to TIFF guide.)
- Launch CRITIR Convert.
- Drag the folder containing images captured with your DJI drone onto the Source folder area. Subfolders are walked recursively; only thermal files (
*_T.JPG) are picked up. - Output format → TIFF (For analysis).
- Pick JPG + TIFF if you also want FLIR-compatible R-JPEGs for spot-checking in FLIR Tools.
- Output folder — originals are never modified; the source's subfolder structure is preserved on output.
- Start conversion. A few hundred milliseconds per file; a 100-image flight typically completes in 1–2 minutes.
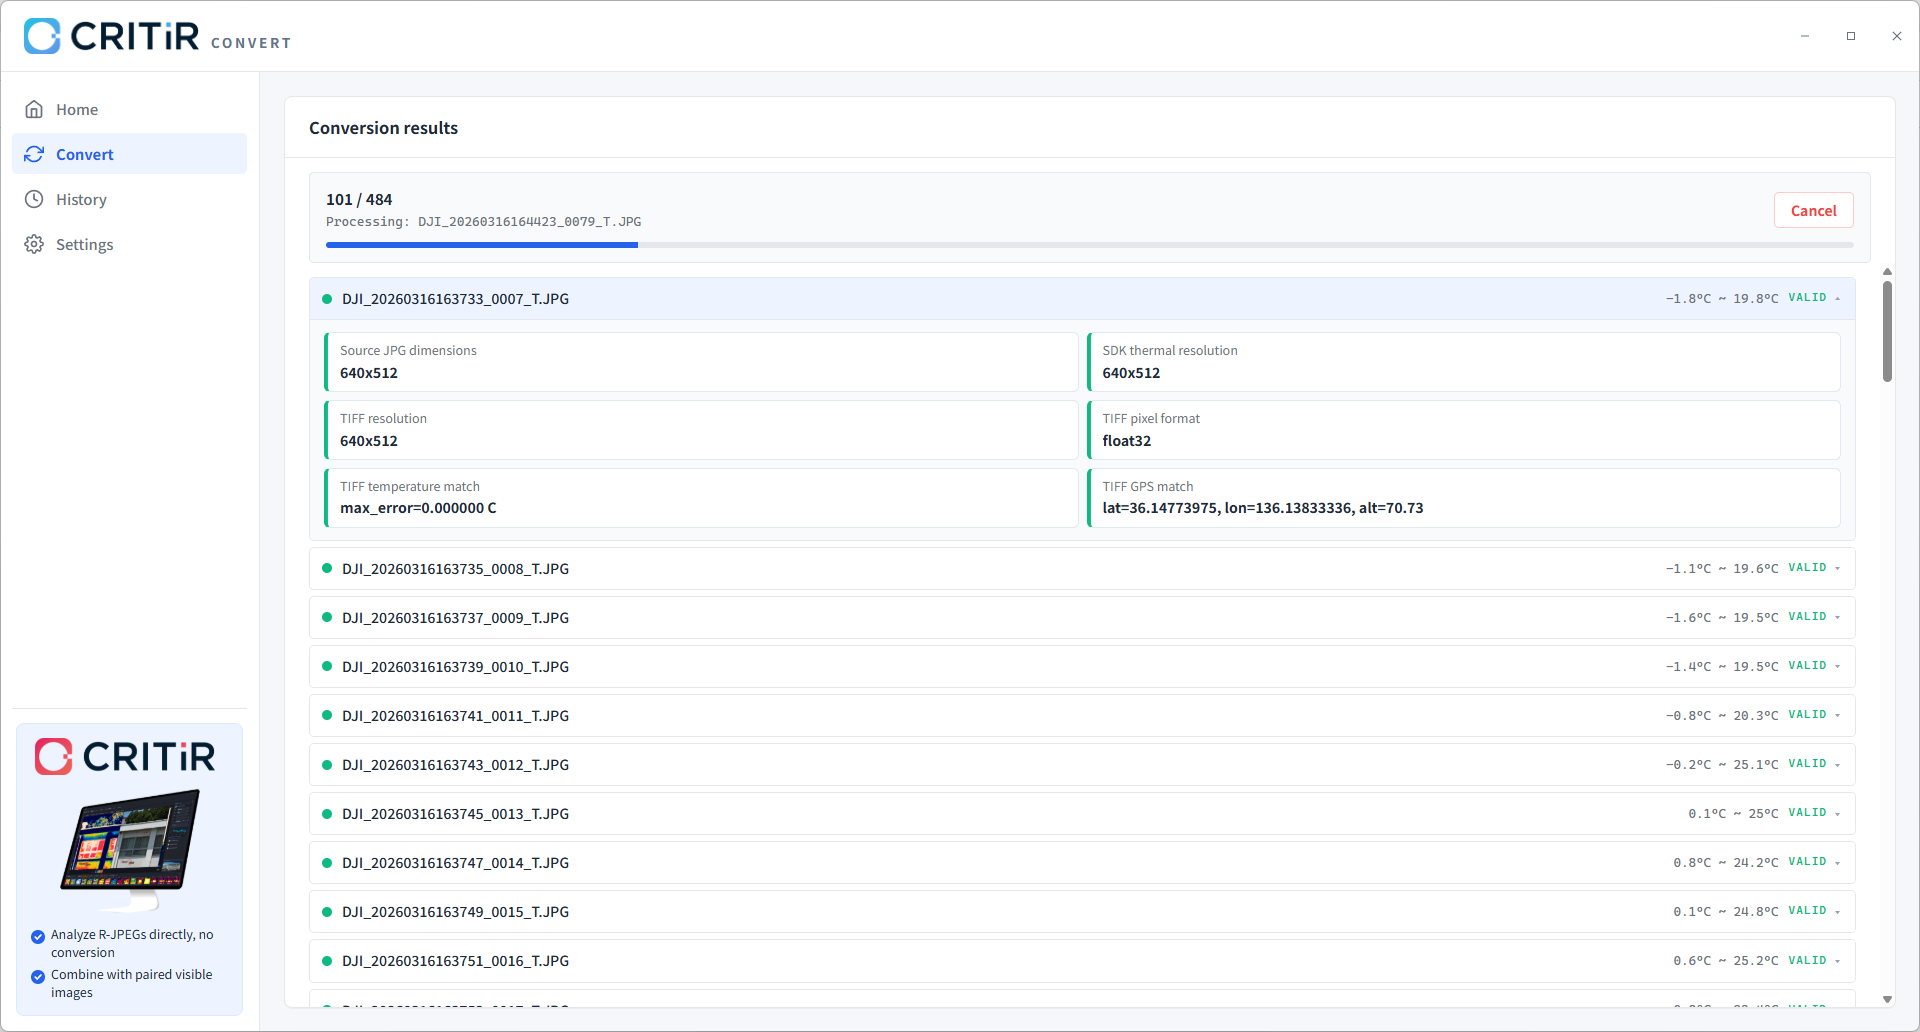
Each TIFF is single-channel, float32, pixel value = degrees Celsius. Resolution depends on the camera and capture mode: M30T / M4T typically output at 640 × 512, H30T at 1280 × 1024. GPS, camera model (Make=DJI Thermal, Model=M30T / M4T / H30T, etc.), capture timestamps (DateTime / DateTimeOriginal / DateTimeDigitized), and the measurement parameters (emissivity, reflected temperature, atmospheric temperature, humidity, capture distance) are written to the TIFF metadata so Metashape's Reference panel and time-based checks are easier to use. Measurement parameters are stored as JSON in the ImageDescription tag rather than standard EXIF fields.
Key facts:
- Pixel value = °C. No multiplier or offset needed in Metashape's
Set Raster Transform. - Zero round-trip error. The DJI SDK's float temperature array is written straight to float32 TIFF.
- Capture timestamps and flight-time measurement parameters preserved. The original R-JPEG capture time is written to standard TIFF/Exif timestamp tags, while emissivity, reflected temperature, atmospheric temperature, humidity, and capture distance remain available in metadata for later review.
Step 2: New Metashape project + add photos
Switch over to Agisoft Metashape.
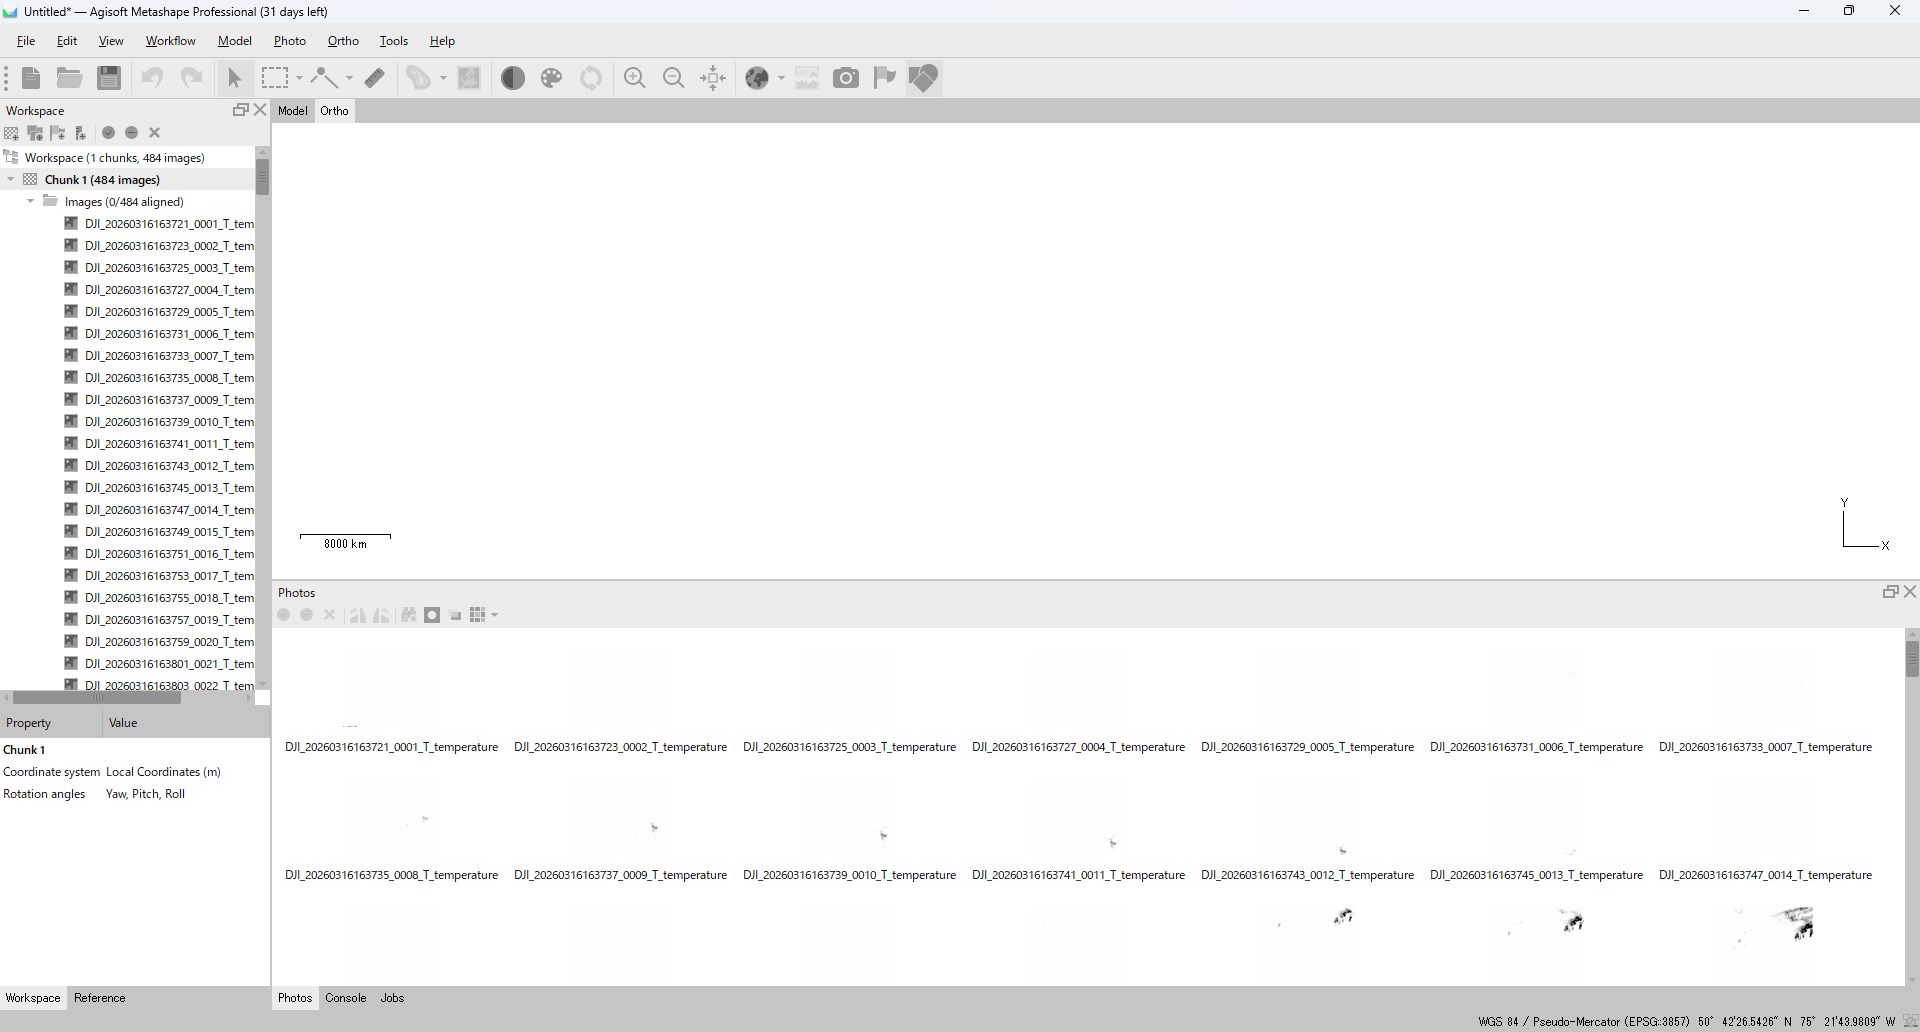
- Launch Metashape and File > New to create a project.
- Workflow > Add Folder... and pick the folder of TIFFs from Step 1.
Step 3: Verify temperatures on single images (Set Raster Transform)
Before running alignment, check that the pixel values are valid temperatures on individual images. Catching a conversion issue at this stage is much cheaper than discovering it after the orthomosaic finishes.
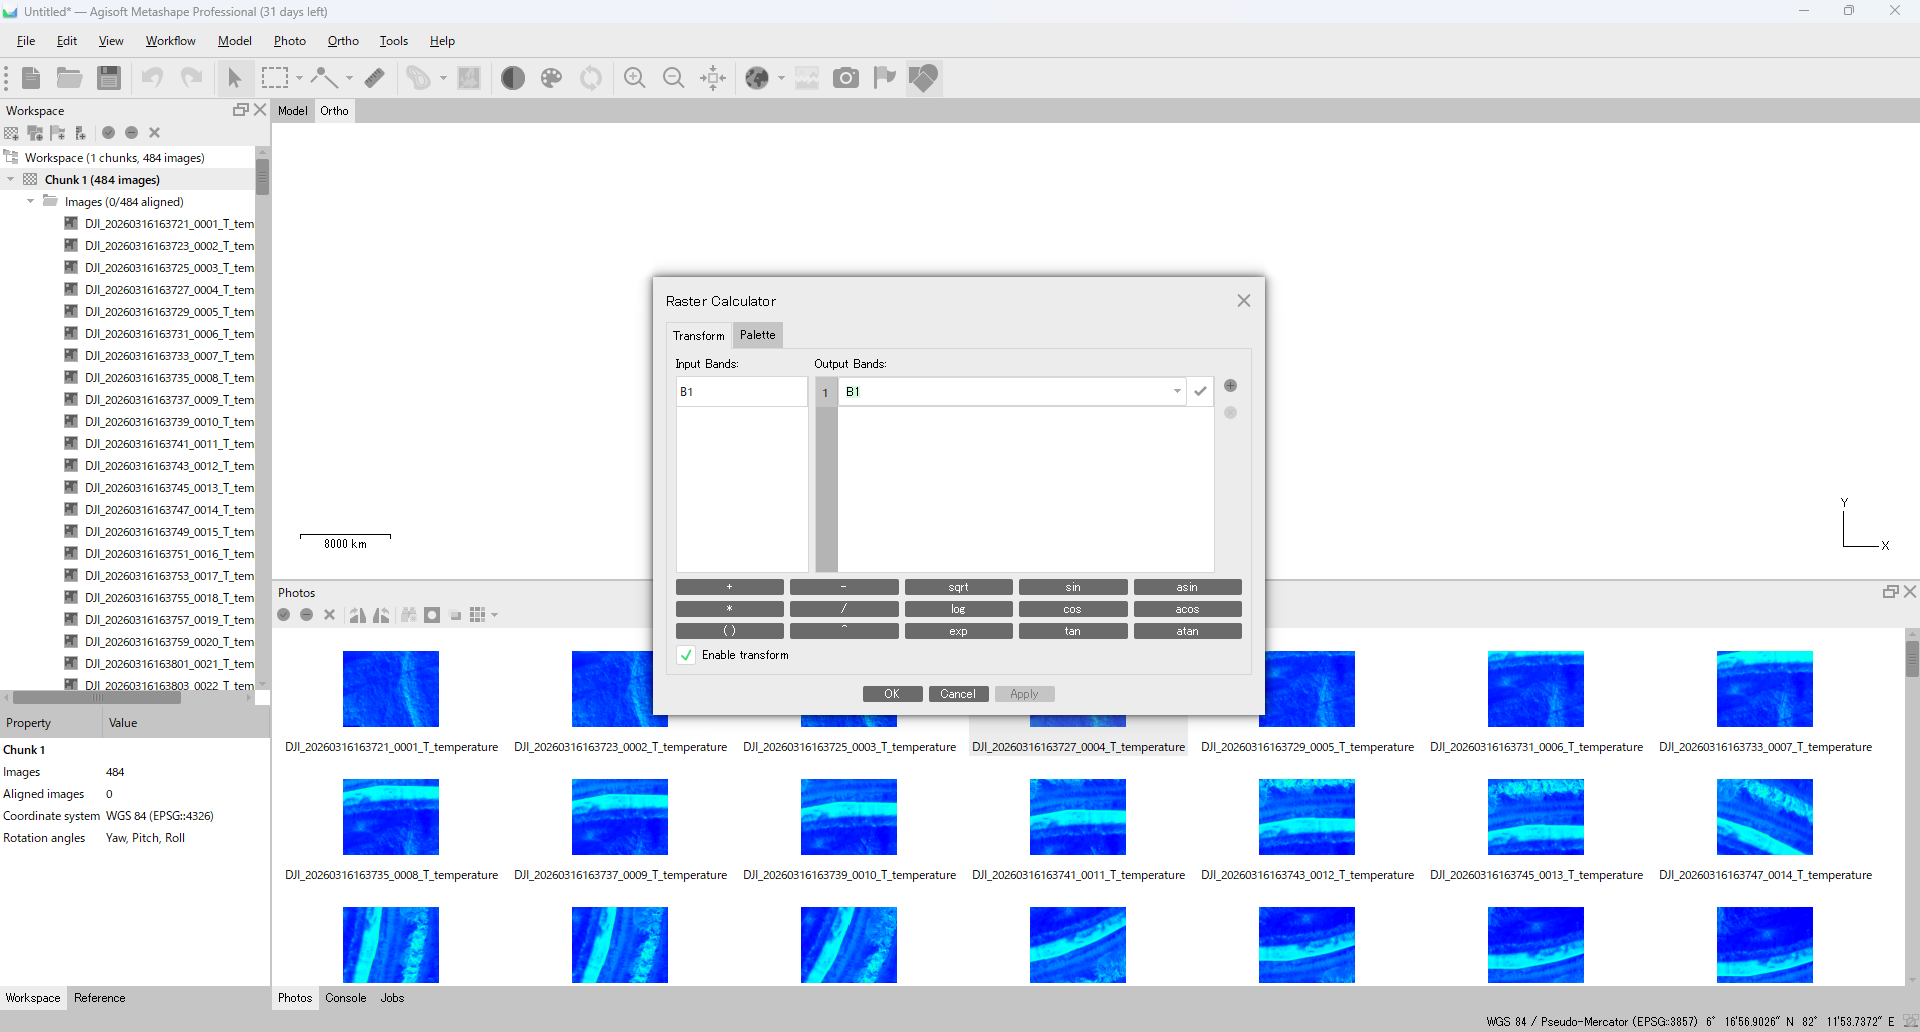
Open Tools > Set Raster Transform...:
- CRITIR Convert TIFFs → enter the identity formula
B1in the Formula field. Pixel value already equals °C, but leaving the formula blank can re-apply a leftover constant from a previous project (e.g.,-273.15) and produce wildly wrong temperatures — so explicitly enterB1to overwrite any stale formula. - TIFFs from another converter that store
coeff × value + offset→ enter the right formula (Agisoft's documentation shows examples like0.01 * B1 - 100).
With CRITIR Convert TIFFs, set the formula to B1, enable the transform, and the image displays as a temperature color map.
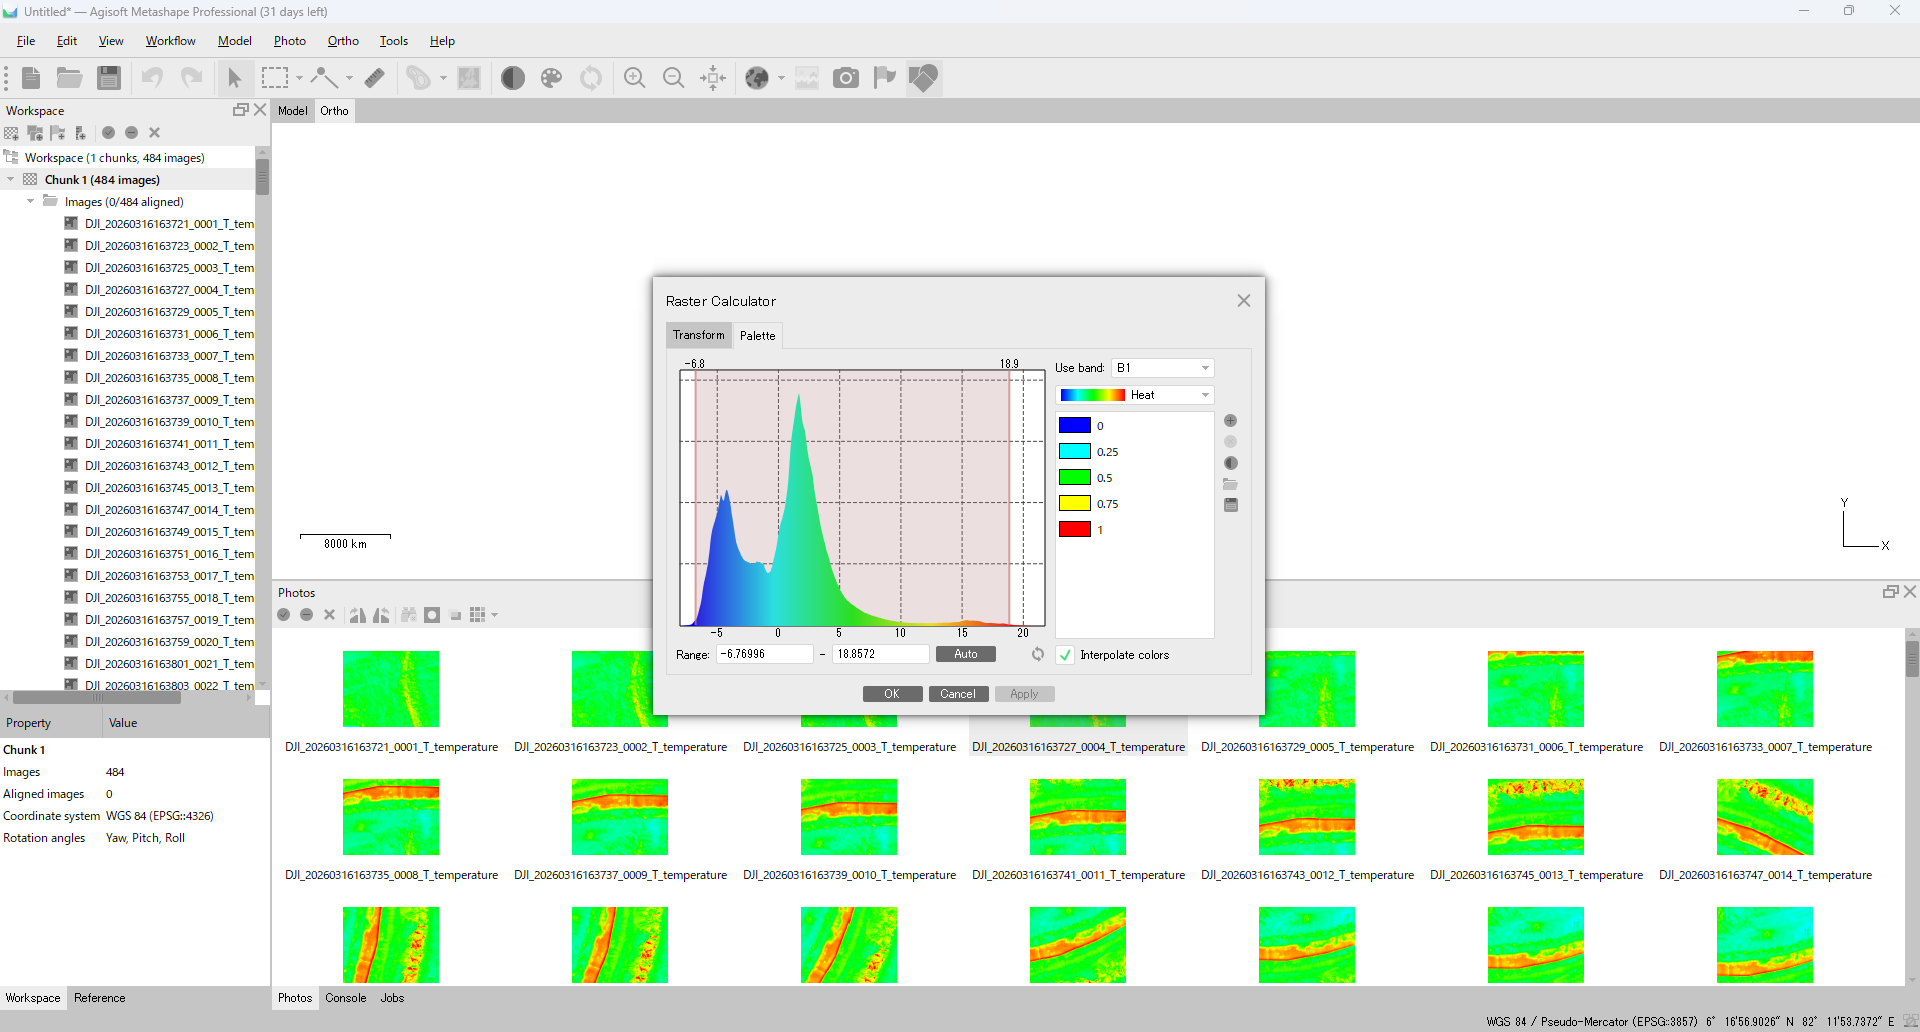
Then switch to the Palette tab, choose Iron / Inferno / Rainbow to match the field colormap, and pin Min / Max to your inspection range (e.g., 20–80 °C). Open any TIFF from the Photos pane — if the colors match what you expect, the conversion is correct and you're safe to proceed to alignment.
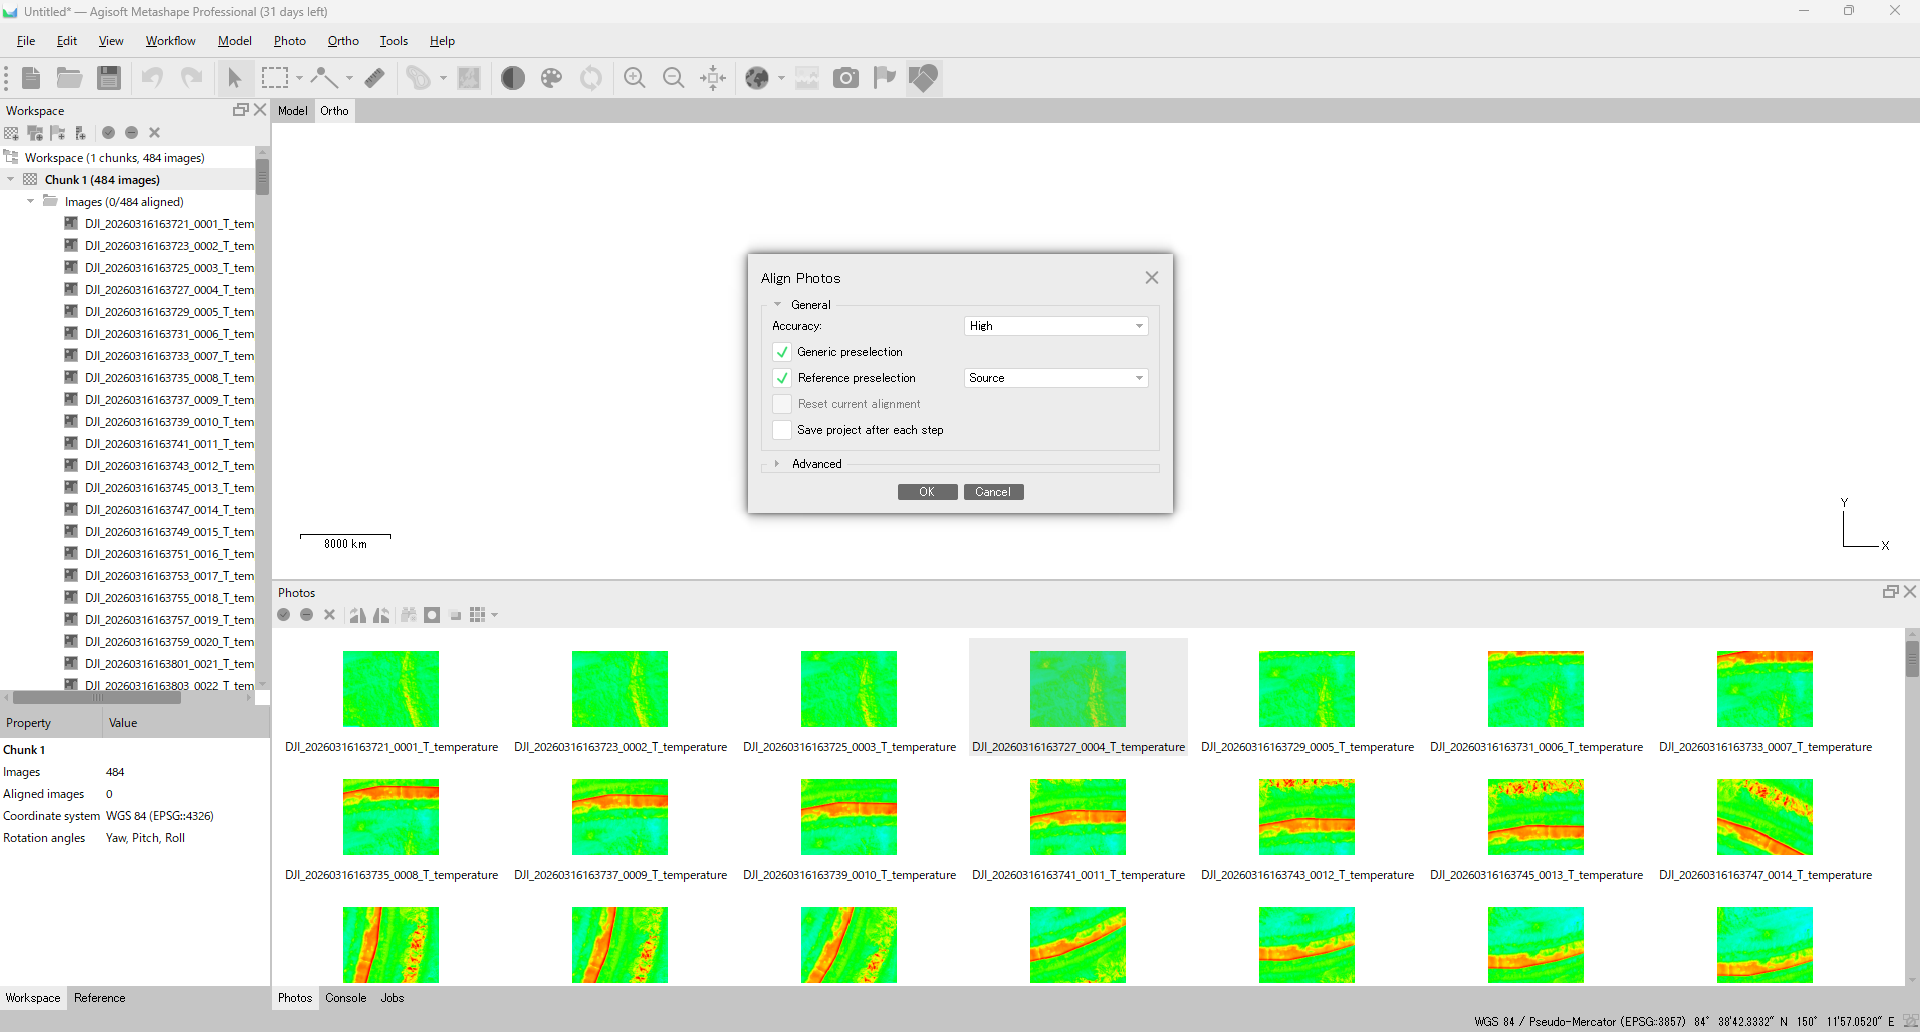
Step 4: Align Photos
Run Workflow > Align Photos... with thermal-tuned settings:
| Setting | Recommended | Why |
|---|---|---|
| Accuracy | High (drop to Medium if it fails) | Agisoft suggests varying Accuracy on thermal; High is usually fine |
| Generic preselection | ON | Helps when thermal features are sparse |
| Reference preselection | Source only if you have RTK / GCP-grade positions, otherwise try OFF | Agisoft recommends Source when coordinates are centimeter-accurate AND accuracy values are set in the Reference panel. Standard consumer GPS is often more stable with OFF |
| Key point limit | 40,000–80,000 | Higher than visible defaults |
| Tie point limit | 4,000–10,000 | Slightly above defaults |
| Adaptive camera model fitting | ON | Stabilizes calibration |
When alignment finishes, the 3D view shows the sparse tie-point cloud and the camera positions for every aligned photo.
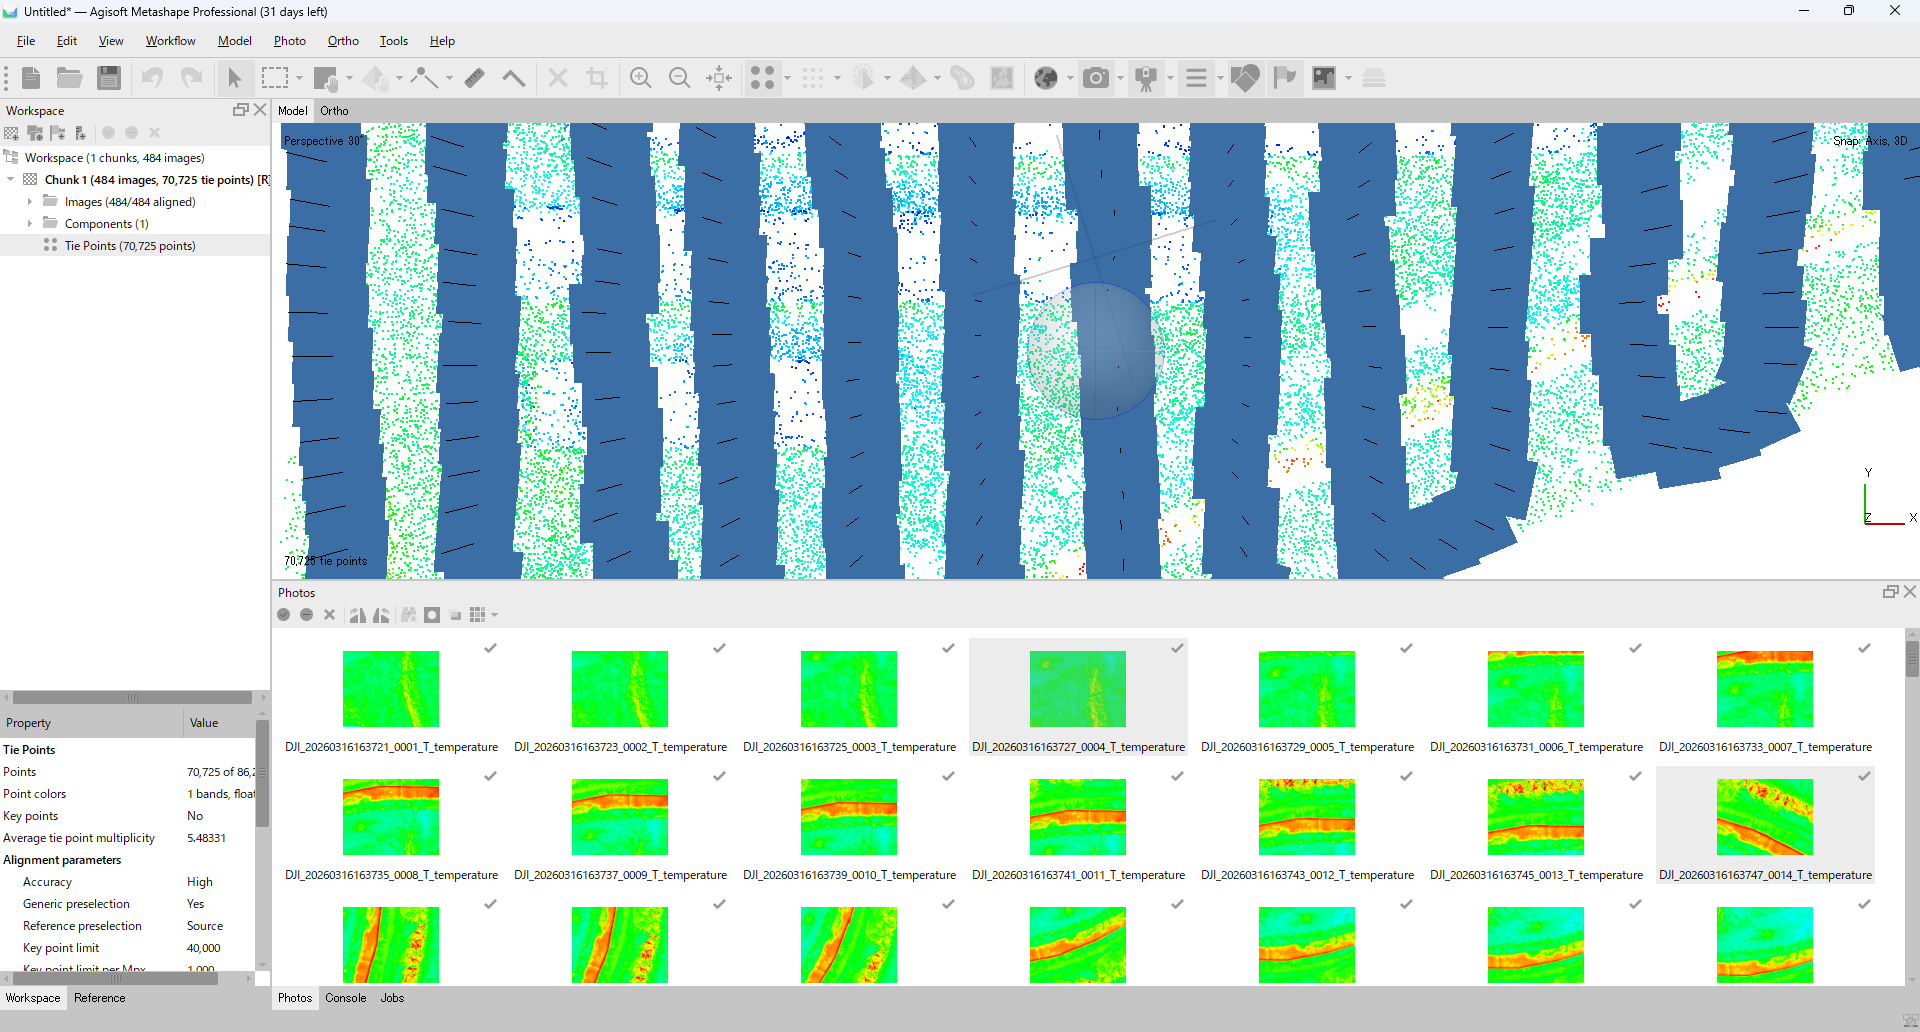
After alignment, check:
- No cameras far off the expected trajectory
- Not many
Not alignedimages - Tie Points distributed across surfaces of interest (ground or wall)
- Buildings / walls roughly the right shape (no major distortion)
If alignment is unstable:
- Drop Accuracy to Medium and retry — counterintuitively, this sometimes helps on low-texture thermal scenes by retaining smaller features.
- Disable Cameras for the obviously broken frames and re-Align.
- If you suspect insufficient overlap, recapture at 80–90% forward/side overlap.
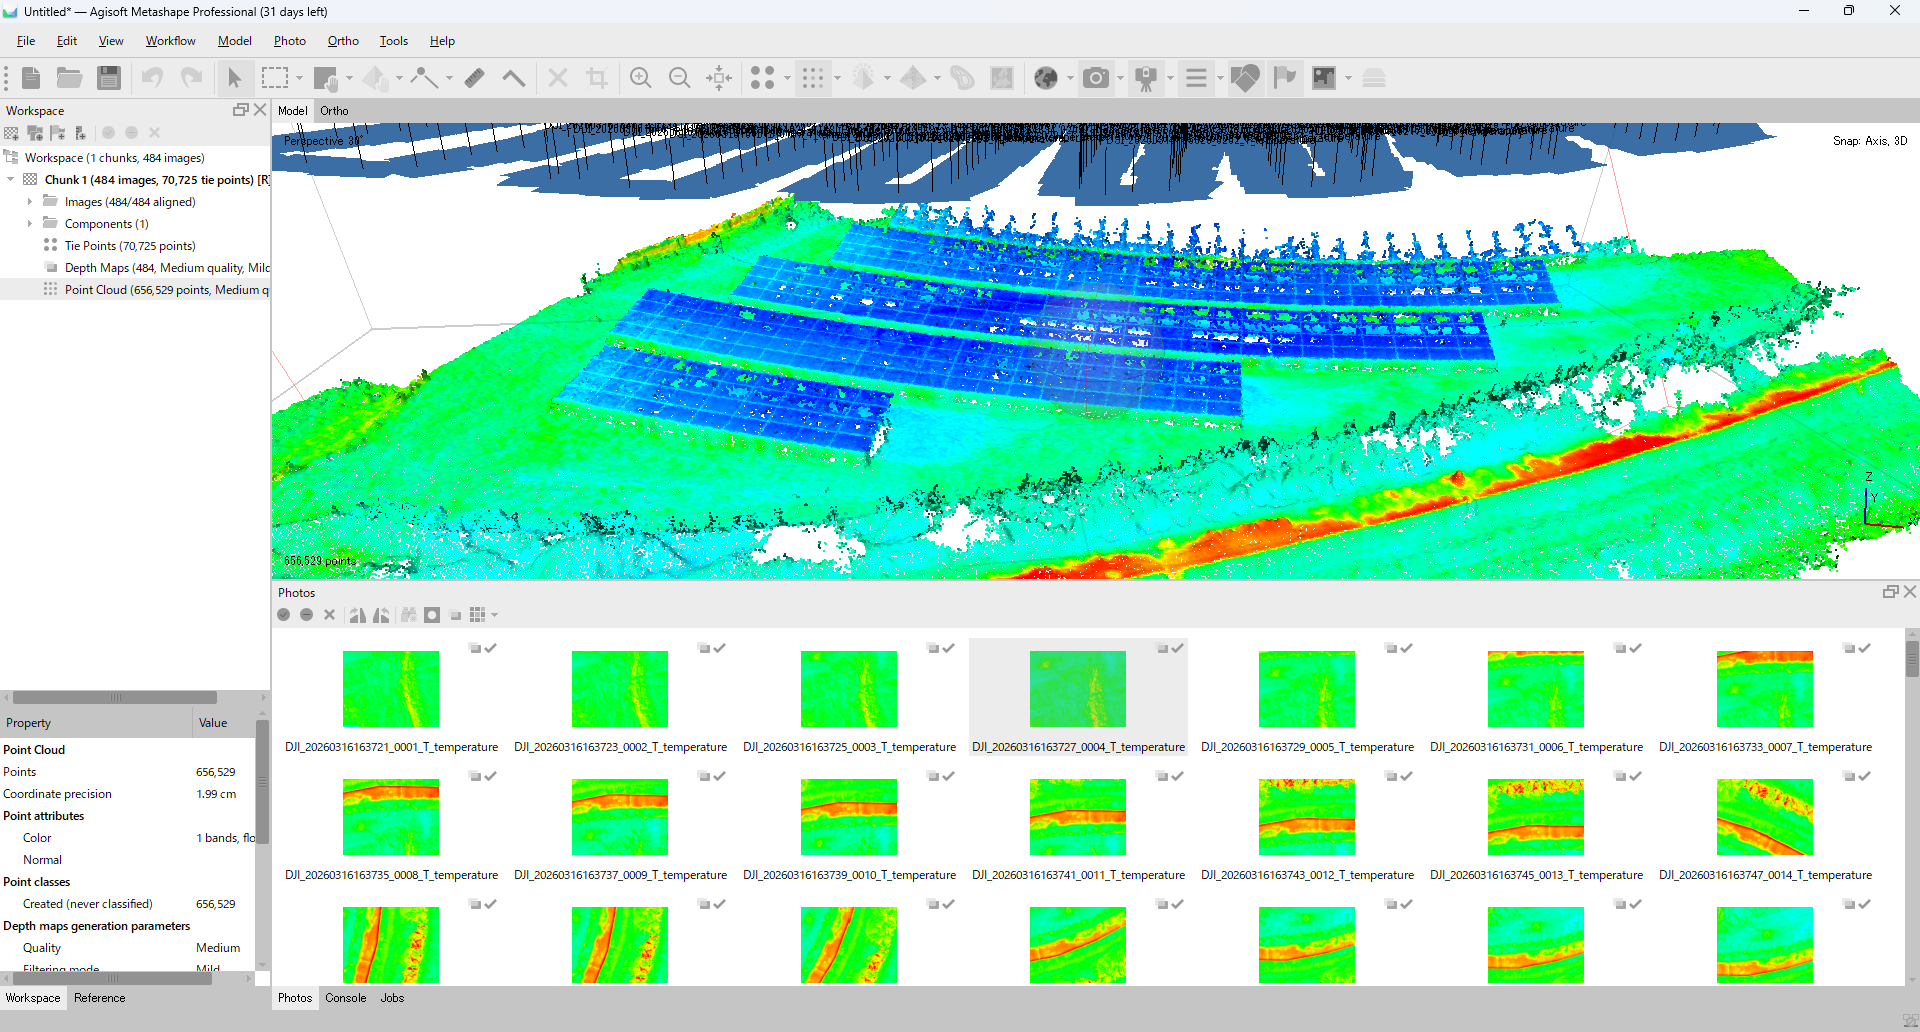
Step 5: Build Point Cloud (or Depth Maps)
In Metashape 2.x, the equivalent of the older Dense Cloud is Workflow > Build Point Cloud....
| Setting | Recommended |
|---|---|
| Quality | Medium (try High if geometry is insufficient) |
| Depth filtering | Mild or Moderate |

On thermal-only datasets, jumping straight to High rarely improves the result much — the alignment side is usually the bottleneck. Run Medium first, inspect the result, then escalate to High only if you need it.
If you plan to drive the DEM from Depth Maps directly, you can skip Build Point Cloud entirely and use Depth Maps as the DEM source in the next step.
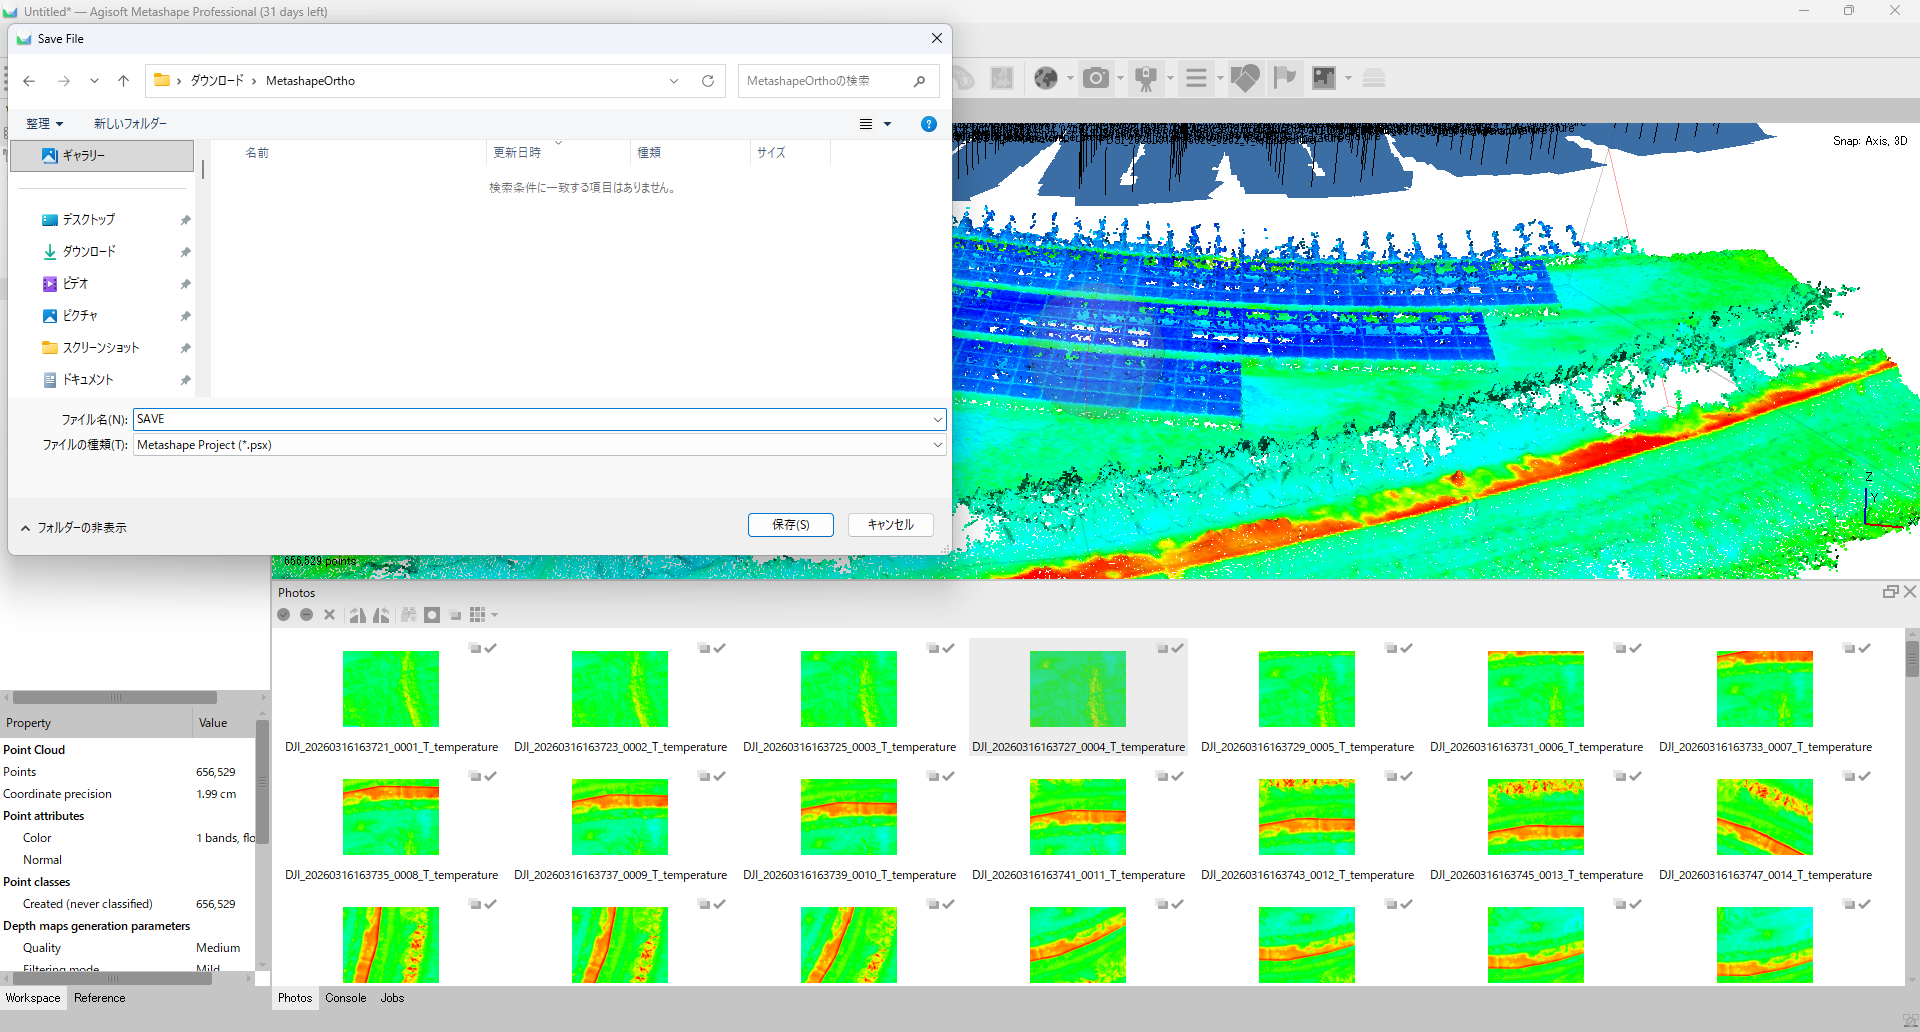
Save the project (required before Build DEM)
Save the Metashape project (File > Save or Ctrl+S) before running Build DEM. Metashape will not run Build DEM on an unsaved project, so writing out the .psx here is mandatory rather than optional.
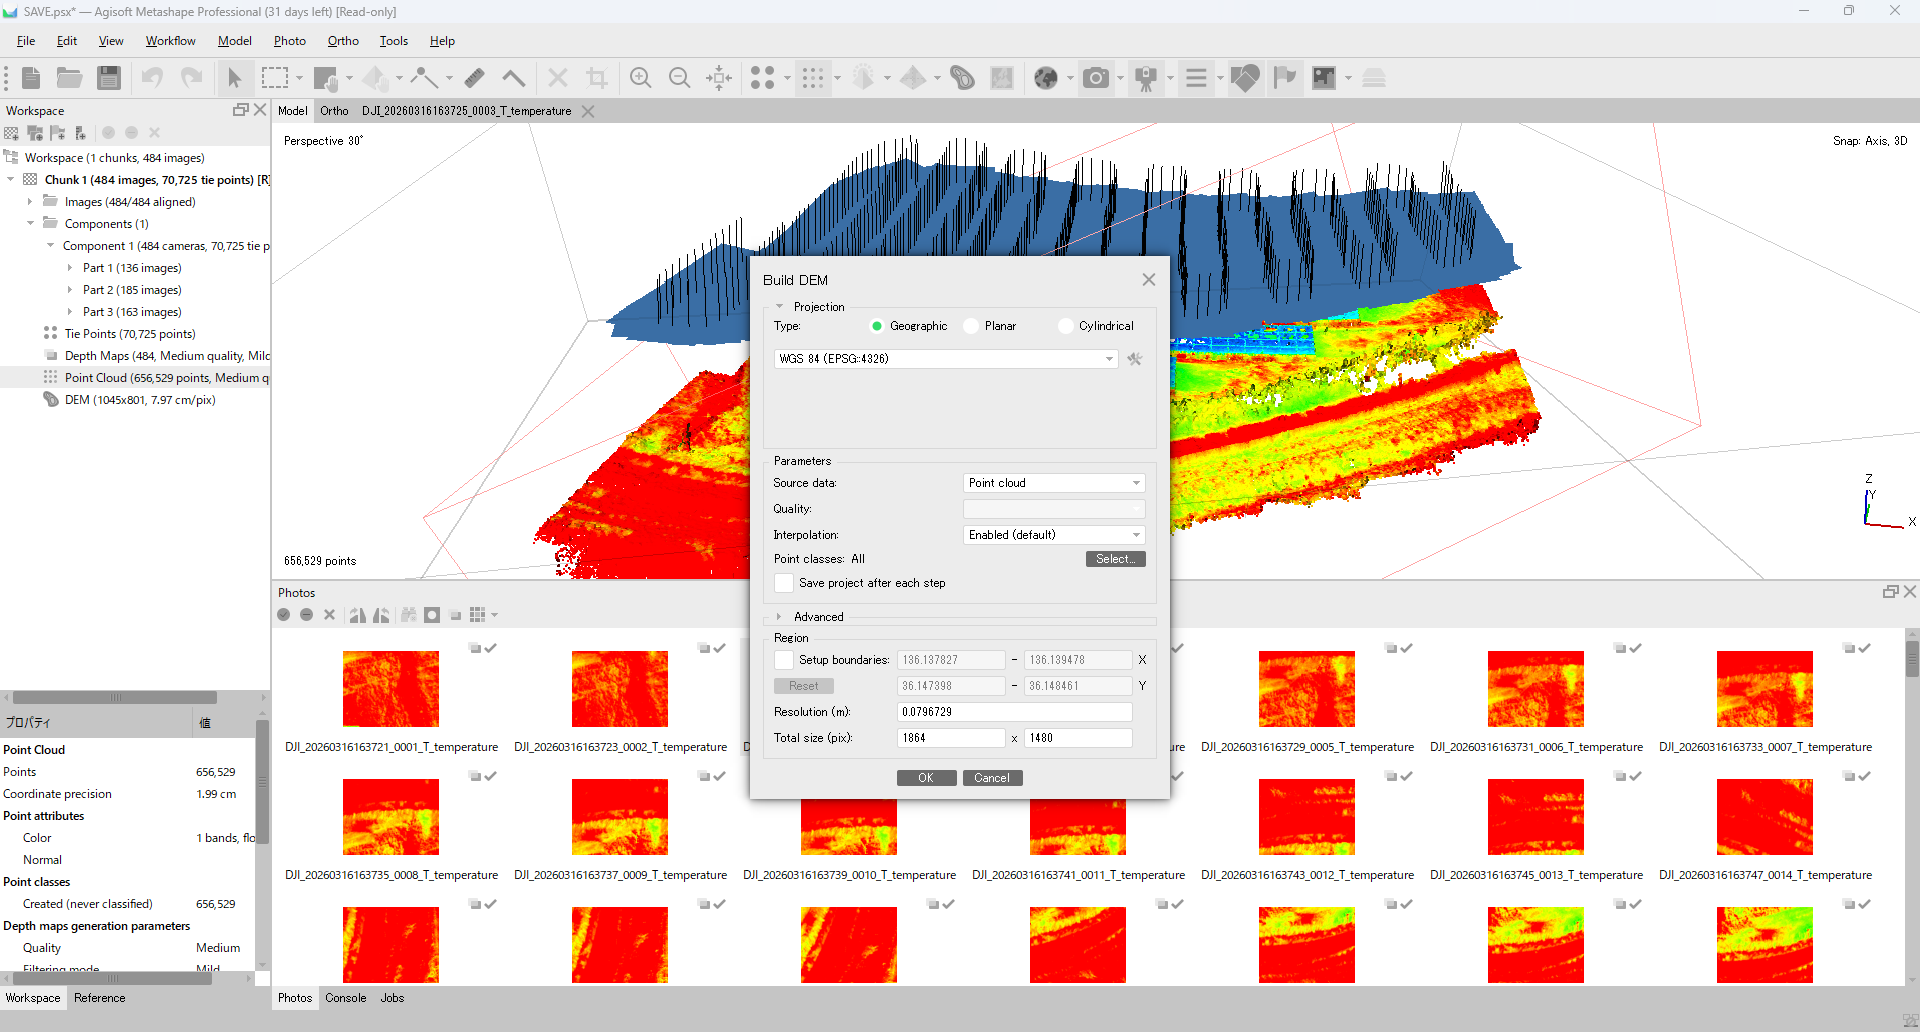
Step 6: Build DEM
Run Workflow > Build DEM.... Agisoft's official thermal tutorial follows the same Align → DEM → Orthomosaic order.
| Setting | Recommended |
|---|---|
| Source data | Depth Maps or Point Cloud |
| Projection | Match the image GPS coordinate system (WGS 84, local UTM, etc.) |
| Interpolation | Enabled |
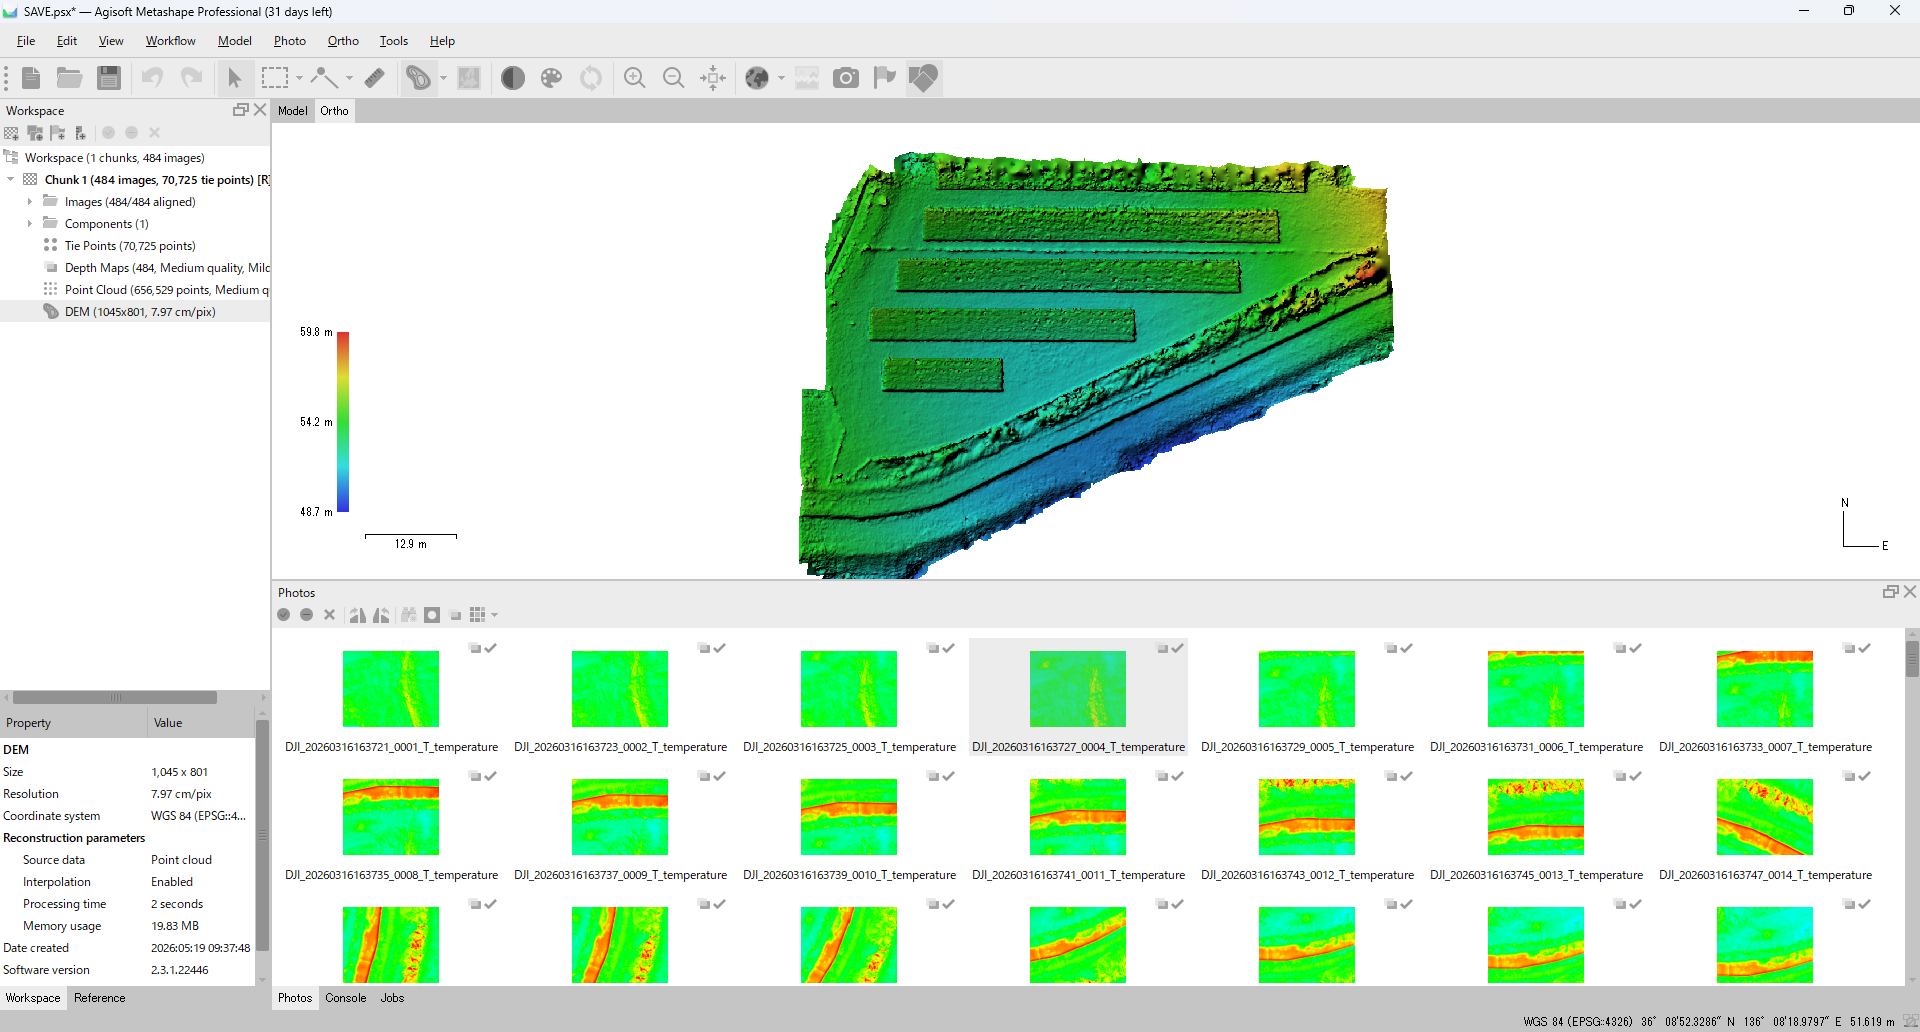
The resulting DEM displays in the 3D view with an elevation color scale (green-to-red gradient). Confirm that the terrain shape looks reasonable before continuing to the orthomosaic step.
For a ground orthomosaic this DEM is what you want. Façade orthomosaics tend to be unstable when the DEM is built from thermal-only SfM — for walls, use Planar projection in Build Orthomosaic to project directly onto the wall plane instead of relying on the thermal DEM. For maximum stability, building geometry from visible-light images and overlaying thermal is more reliable, but that's outside the scope of this thermal-only guide.
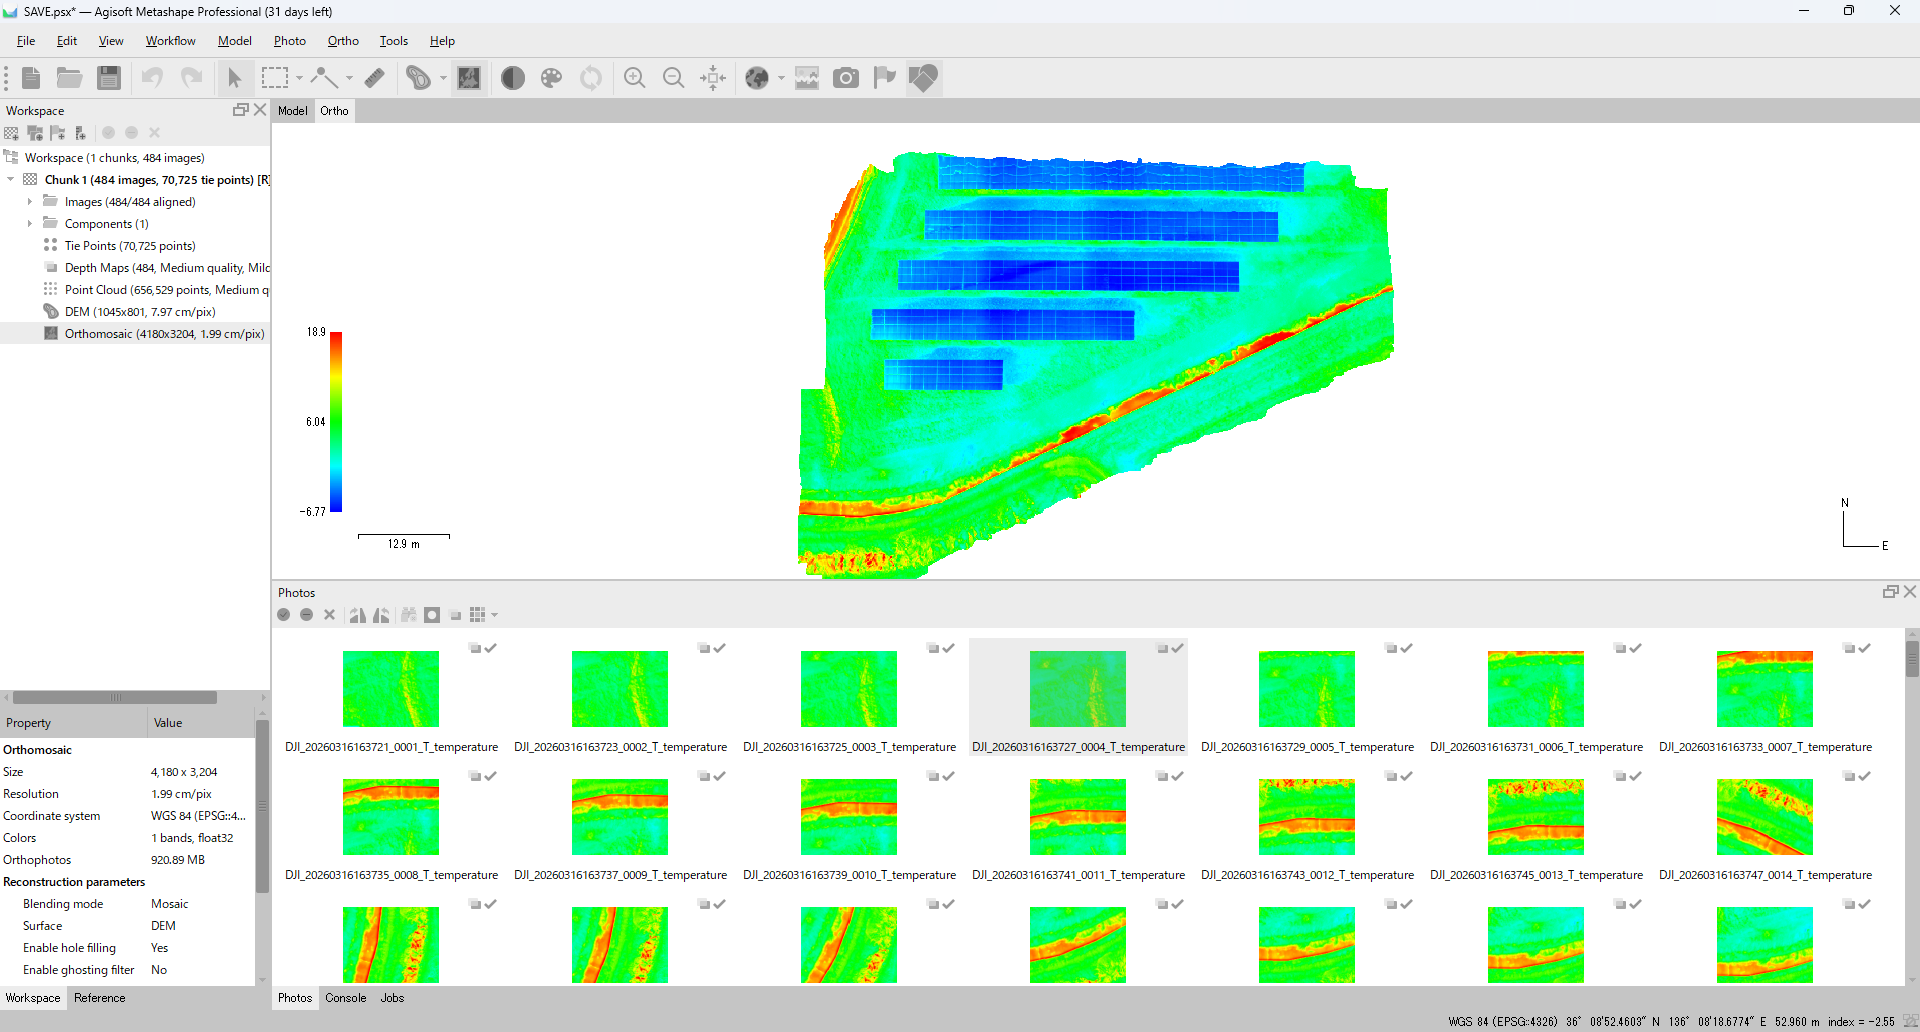
Step 7: Build Orthomosaic
Run Workflow > Build Orthomosaic... to produce the thermal mosaic.
| Setting | Recommended |
|---|---|
| Surface | DEM |
| Blending mode | Mosaic |
| Projection | Same coordinate system as the DEM |
| Pixel size | Auto, or specify if you need a fixed GSD |
| Hole filling | ON if needed |
| Enable ghosting filter | Default (ON if you see double-ghosts) |

Blending mode = Mosaic is generally safer than Average for thermal. Average mixes temperatures from images captured seconds apart, which on a building façade can smear out real temperature gradients. Mosaic picks one image per pixel and minimizes seam jumps.
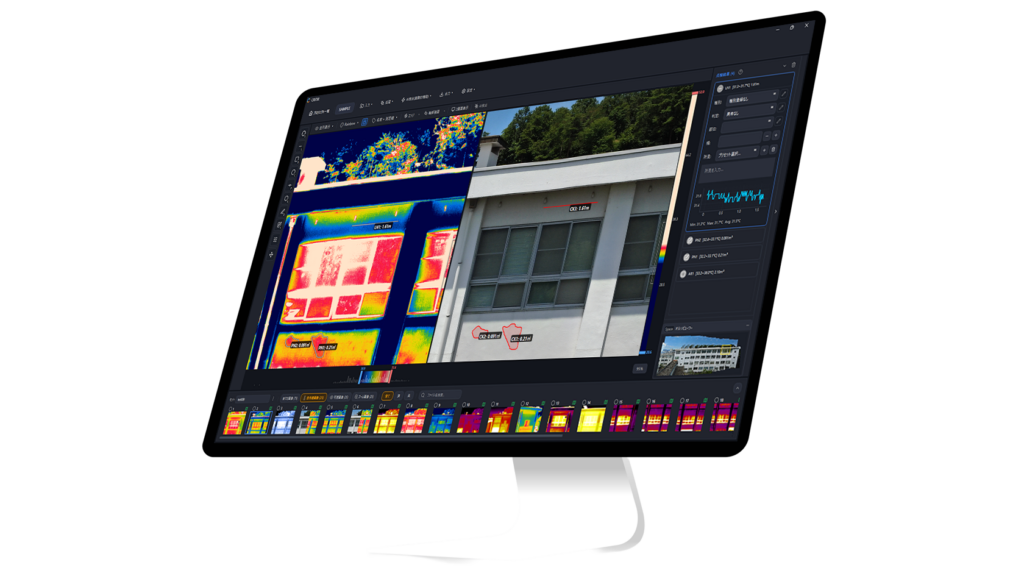
When Build Orthomosaic completes, Metashape displays the orthorectified thermal layer with the active temperature palette. The cover image used for this article is the same kind of completed orthomosaic result:
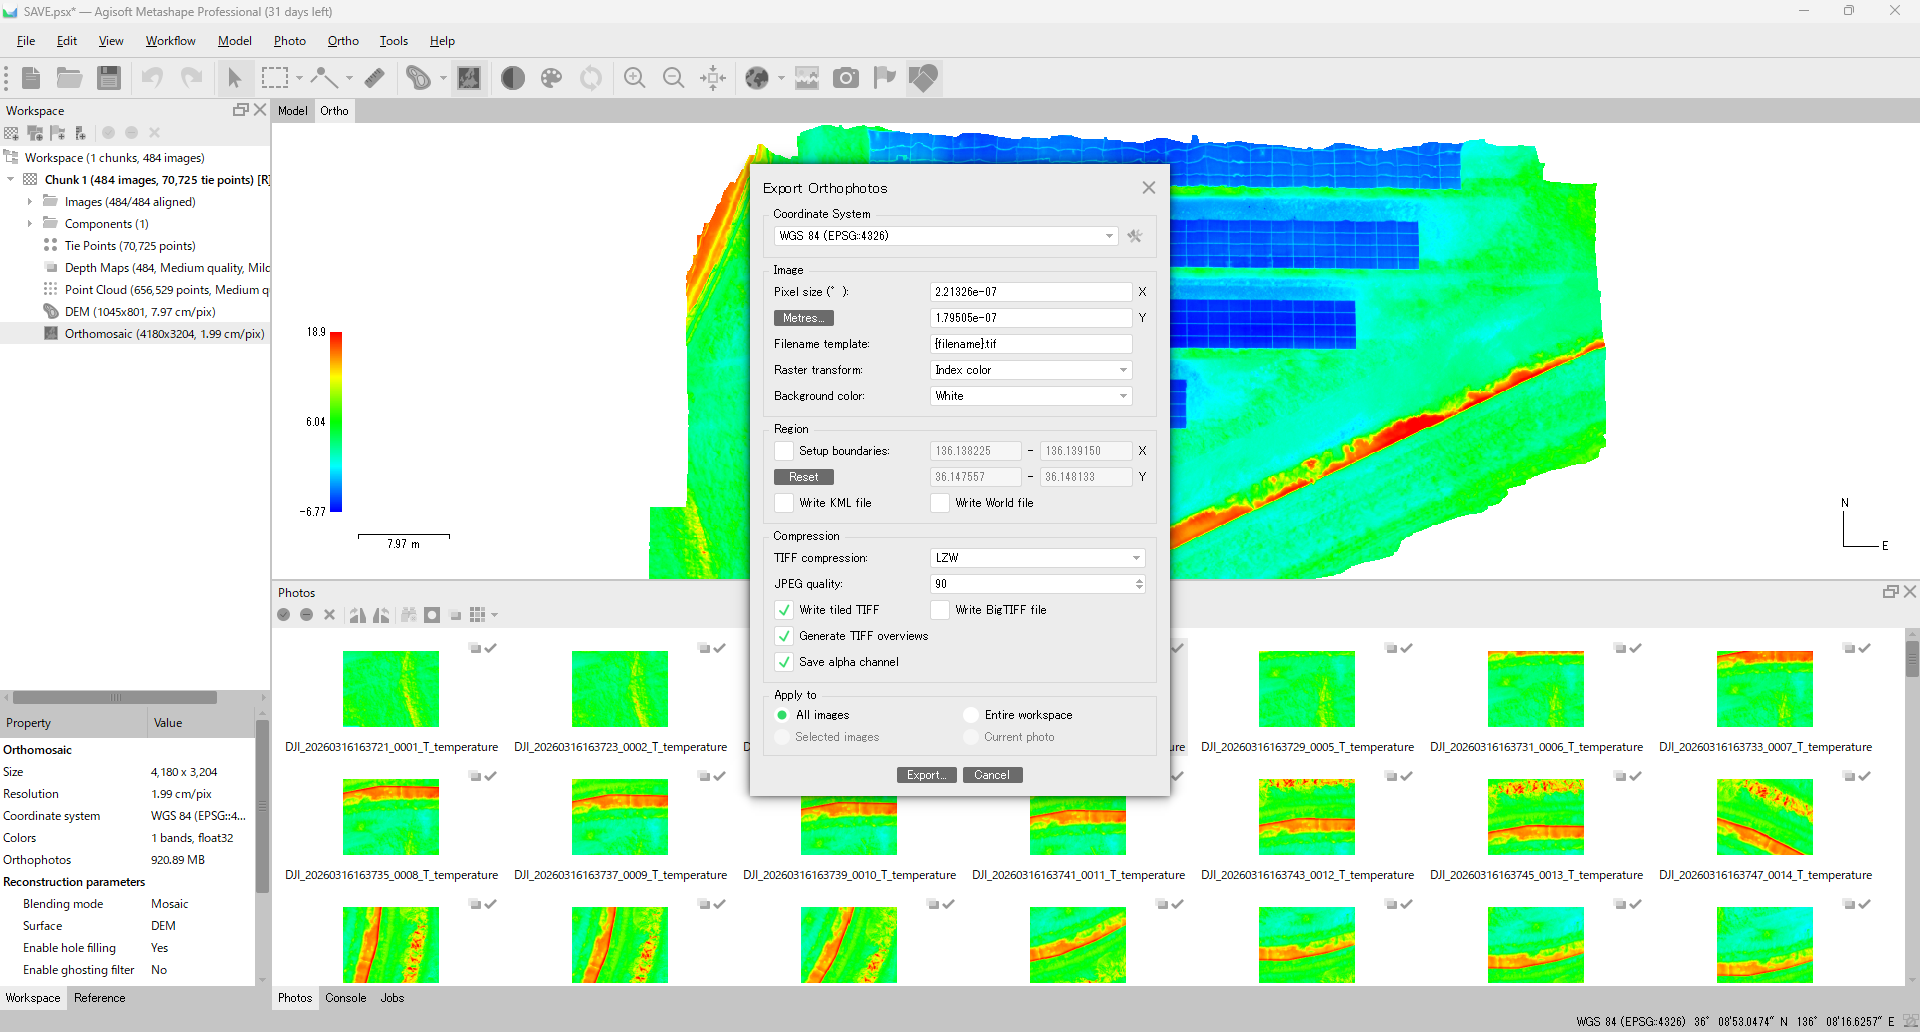
Step 8: Export the orthomosaic
File > Export > Export Orthomosaic > Export TIFF/BigTIFF.... Pick the export profile by deliverable:
| Use | Format | Bit depth |
|---|---|---|
| GIS / analysis (QGIS, ArcGIS, Python) | GeoTIFF | 32-bit float |
| Long-term archive (temperature-preserving) | GeoTIFF | 32-bit float |
| Visual review / report figure | TIFF / PNG / JPEG | 8-bit color |
| Pseudo-color image for a report | PNG / JPEG | 8-bit color |
If you ever want to do quantitative analysis later, save a 32-bit float GeoTIFF. Exporting only 8-bit color destroys the temperature data — once it's gone, you can't recover it from the image. Keep "analytical GeoTIFF" and "report figure PNG" as separate exports.
The Export Raster Transform toggle changes behavior:
- OFF — raw pixel values in °C are written. Use this for the analytical export.
- ON — palette-mapped 8-bit color (e.g., Iron) is written. Use this for the report figure.
Thermal orthomosaic pitfalls
Common issues you'll run into in practice:
- Thermal-only SfM is fragile. Fewer features than visible, easily confused by low-texture surfaces, reflective surfaces, sky, and vegetation. Agisoft acknowledges thermal "tends to be lower quality."
- 80–90% overlap is mandatory. Visible-style 70–80% will fail on thermal — the matcher needs more redundancy.
- Seam temperature jumps. Frames captured at different times on the same surface can show striping as the sun heats things up. Keep the flight short and use Mosaic blending.
- Windows and reflective surfaces. Glass reflects sky temperature in IR — poor SfM features and confusing temperatures in the final ortho. Disable those cameras.
- M4T super-resolution mode. With super-res on, the M4T's JPEG header reports 1280 × 1024, but CRITIR Convert writes TIFFs at the sensor-native 640 × 512. Metashape's Image Size = 640 × 512 is correct.
- Don't accidentally drop to 8-bit. The single most common way to lose temperature data is exporting once with
Export Raster Transformon and overwriting the analytical TIFF. Save the float32 GeoTIFF first, then export the report figure separately.
Skipping the converter route entirely with CRITIR
The two-stage workflow above is the natural fit for teams already invested in Metashape (or Pix4Dmapper). If that's you, CRITIR Convert + Metashape is the most direct path.
For teams whose deliverable is "inspection report" rather than "GeoTIFF for GIS," there is a one-app alternative: CRITIR, the sister app to CRITIR Convert. CRITIR opens DJI / FLIR / HIKMICRO thermal files without conversion, then handles wall and surface orthomosaic generation and PDF / Word / Excel / DXF report output internally.
| Your situation | Recommended tool |
|---|---|
| You're already on Metashape or Pix4Dmapper | CRITIR Convert (this guide) |
| Downstream analysis in QGIS / ArcGIS | CRITIR Convert (export GeoTIFF) |
| End-to-end report production in-house | CRITIR |
| Routine façade / thermal ortho deliverables | CRITIR |
| Heavy visible + thermal overlay analysis | CRITIR |
The decision is mostly a function of how many inspection projects you process per year and whether you already own the SfM software. For pricing details, see CRITIR pricing or the CRITIR Convert pricing page.
FAQ
- Can I use the same CRITIR Convert TIFFs in Pix4Dmapper instead of Metashape?
- Yes. Pix4Dmapper supports TIFF including floating-point TIFF, and the Thermal Camera template will load the same files. Note that Pix4D's documentation prefers RJPG for thermal and warns that some TIFFs from third-party converters do not carry radiometric data in a form Pix4D can use. CRITIR Convert's TIFF stores temperature directly as the pixel value, so it works for Pix4D temperature analysis as well.
- Does Metashape Standard work for thermal orthomosaics?
- No. Orthomosaic generation is Professional-only — Standard stops at alignment. For production thermal ortho work, Metashape Professional is required.
- Can I pin a fixed temperature range across multiple sites?
- Yes. In Set Raster Transform, set Min / Max manually. For multi-site or multi-day reports, pinning the same range project-wide makes color comparisons meaningful — temperature deltas read off the page instead of being hidden by per-image auto-scaling.
- My façade orthomosaic is warped or unstable. Why?
- Thermal-only SfM typically struggles on low-feature walls. Try dropping Accuracy to Medium, recapturing with 80–90% overlap, and disabling reflective frames. If it's still rough, the wall-orthomosaic features in the sister app CRITIR are often a faster path than tuning Metashape further.
- My exported orthomosaic has lost temperature data — it's just a color image.
- The most likely cause is exporting with Raster Transform applied, or choosing an 8-bit profile. For the analytical export, choose 32-bit float GeoTIFF with Raster Transform off. Export the colored 8-bit version separately for the report.
- Can I build a thermal orthomosaic from thermal video (MP4)?
- This workflow assumes still R-JPEGs. For video you'd need to extract frames into R-JPEG / TIFF first before feeding Metashape. CRITIR Convert handles stills only.
- Is there a CRITIR Convert trial?
- Yes, a 7-day free trial covering the full feature set. Request it from the contact form. We also offer a managed conversion service if you'd rather send us the files.
Summary. Building a temperature-preserving thermal orthomosaic from DJI thermal data is an 8-step pipeline: CRITIR Convert → TIFF, Add Folder, Set Raster Transform (single-image verification), Align Photos, Build Point Cloud / Depth Maps, Build DEM, Build Orthomosaic, Export as 32-bit float GeoTIFF. Capture with 80–90% overlap and use Mosaic blending and thermal-only SfM stays usable even without a visible-light overlay.
Full DJI camera support list: compatibility page. Pricing: pricing page. Managed conversion service is also available.
Try CRITIR Convert
Convert DJI thermal R-JPEGs into FLIR-compatible files. 7-day free trial available.
See the product page